Thursday 30 May 2013

Lilacs

When I moved in to my beautiful little home I had an overgrown yard . . . everything was overgrown and not taken care of . . . I was forced to make some drastic changes but I had to do so over time . . . this neighbourhood was built between 1945 and 1950 so what little was in the yard was HUGE to say the least and everything else was either neglected or removed completely so that there was NO maintenance except to cut the grass - I needed more - not more work just more to look at.

Part of my overgrown predicament was the lilac bushes in the front yard - not the tree kind, the bush kind.  They "sucker out" and grow like mad stupid . . . I'd had enough . . . I couldn't see out to the street so called my local tree cutter and had him cut them back by one third (that meant leaving one third and cutting off the top two thirds) . . . BIG MISTAKE . . . if someone (being the tree cutter guy) had of told me that it may be a while (or never) before I see another lilac on those bushes I may have never cut them down or I would have made a decision to cut them out completely . . . So because of my ignorance, last year I didn't get one . . . that's right . . . NOT ONE . . . but this year is another story . . . I have twelve peaking out so far!

What used to be a lush forest of purple is now a sea of green but I have the smell of 12 and I reluctantly cut six of them down because I love them in the house.

Note to self . . . DON'T EVER DO THAT AGAIN!  Hopefully  next year I'll see more, for the time being, I'm happy with this small bouquet!

Tuesday 28 May 2013

Wedding Garter

I got home tonight and thougt I'd do some yard work . . . I did actually get started but I heard thunder on the horizon and decided to vacate that idea and come inside - watched a bit of the news and then I got really antsy . . . you could say bored . . . I just can't sit and do NOTHING!

So I came upstairs to see if I had any fleece to make some more baby hats and I was distracted by a piece of cream wide lace elastic I was looking for a couple of days ago to make my niece a garter for her wedding . . .

So I gathered all of the beads, ribbon and thread I needed to get started and was inspired by some brownish/linenish coloured organza ribbon and made a couple of bows, added a few beads and sewed the lace together all by hand . . .


Wrap back and forth to make two loops on either side; then pin

Running stitch in the centre; pull tight wrap around a few times and secure

String beads to centre of bow to cover gathering; I made a dangler that says "MRS"
 I think it turned out pretty cute for a quick (what to do when you are bored) project.

TOTAL COST:  Zero - I had everything
TOTAL TIME:  1/2 hour

A little driftwood and a LOT of ideas

I was given a box of driftwood from a good friend at work (whom I ADORE) and I think she was as excited about what I was going to do with it as I was thinking what TO DO with it . . .

I did some exploring on the Internet (almost always my first source for inspiration) and saw a couple of things but nothing that really popped out at me . . . I was distracted (as I always am) when I'm googling anything and ended up on Pinterest . . . again . . . and saw a necklace thingy that had knobs on it and thought . . . hey . . . I could use the driftwood for that . . . so off to Pier 1 I go this morning to look for knobs . . . I know they have a clearance section and sometimes you can get them for super reasonable prices . . . and sure enough they had some . . . I wanted an eclectic look so was looking for four of five different ones . . . on sale of course . . . and ended up with four very different looking but still kind of matching knobs.

First of all I had to dry the driftwood out because I'd left it in the box in the yard beside my house and it rained all day . . . further delays to a project . . . watch some TV . . . let it dry overnight in the basement and then start to cut off the ends . . .

I set out to saw off the pieces that didn't work with my plan . . .


Cut off the smaller bits with some small shears . . .

Got rid of some of the bark with the putty knife  . . .


Then I sanded the sh*t out of it . . .


Drilled holes from the FRONT with one size larger than the screw


Drilled holes using a larger bit on the BACK so that I could countersink the nuts


Here's a picture of the back


Attached the knobs . . . and here's the end product . . .  the little one on the top has two round hooks on it for hanging lighter things . . . I would have used the one with the knobs as a jewellery hanger but decided to give it to my friend WHOM I ADORE (as mentioned above) as a gift . . . she's going to let me know what she does with it and I'll post a pic of what she does . . . I've come up with another idea for some of the other driftwood so stay tuned.


You could also use is kitchen door knobs, small hooks, door handles combined with S rings; you could milk paint OR spray paint the driftwood . . . I think there are numerous possibilities . . .

Would love to see what you would do

TOTAL COST:  $5.42
TOTAL TIME:  1 Hour

Saturday 25 May 2013

First comes love, then comes marriage, then comes . . .

Well you know the rest . . . a baby of course . . .

and lots of them it seems these days . . .

Found this pattern on www.fleecefun.com and had to try it, mostly because someone else I know is having a baby but doesn't know the sex . . . and it's a lot harder to make a crocheted hat if you don't know the sex of the baby so you really need to do something generic.

I wanted to make little knit fabric touques (the ones you see on the newborns in the hospital) but if you can believe this there wasn't one piece of fabric in my favourite store that was appropriate.  Lots of knit fabric, but nothing that was "baby" . . . then I thought I'd use fleece but thought it was too thick . . . and because I had it in my head I was going to make them out of felt anyways I headed to the felt . . . note . . . the pattern is "fleecefun" and I'm using felt . . . tormented myself getting the felt when really I should have been looking for fleece all along . . . that'll be another blog now I guess . . . anyways . . .

Here's what I started with:  Five pieces of 8X10 felt; 2 red, two cream and 1 green


Cut as per pattern


I hand stitched the stems and embellished the leaves with embroidery thread.

Then I serged them together per the pattern instructions.

Here they are:

Pumpkin Hat

Apple Hat


And here is the little Apple of their Eye! Beautiful

TOTAL COST:  $3.32
TOTAL TIME:  1 HOUR

I'll post more if I make more out of the proper fabric next time . . . in the meantime I think these are pretty cute!

Friday 24 May 2013

Wine Corks . . . looks like a campfire

I saw this on the Internet . . . yes of course while looking for things to blog and loved this idea . . . it took a couple of tries but I got it to look like I wanted it to after several tries . . .

You need a large vessel and a smaller vessel to fit inside with a bunch or wine corks (and trust me after all of the wine I have drank and saving corks for just the right project) I've saved enough to get this just right (and have a few left over) . . . you shouldn't be worried - I don't drink them all myself.

Here are the supplies I started with (but didn't necessarily end up with)

 
You must ensure that the outside glass vessel is large enough for the inside glass vessel to fit inside while still being able to insert the wine corks then stick the corks BETWEEN the inside and the outside vessel (or container if you want to call them that)
 
This is the inside of a larger vessel (top view)  Insert a tea light candle inside the INSIDE container and light it
 
This is a view (before it got really dark
 
This is a picture of the really dark shot - kind of looks like a campfire don't you think . . . I LOVE IT
 
TOTAL COST:  ZERO
TOTAL TIME:  10 minutes


New Bride - Different Alternation

Like I said - I LOVE weddings - am obsessed by them! and love when I get another alteration.

This one was just slightly different.  She needed the bust adjusted, cups inserted and a bustle.  No problem . . .  Except that lace is a lot harder to alter than it looks.

First you need to remove all of the lace and when you do that all the beads fall to the ground . . .


then you need to dart it

replace the lace and insert the breast cups


replace all the beads


bustle it

and wait for the bride to love it . . .

and SHE DOES!

Total cost for Alterations:  $175.00
Total time:  5 Hours

Sunday 19 May 2013

Gazebo/Pergola Drapes (Installed)

I have to admit I made these for my daughter for her Pergola at Christmas but now that spring has finally arrived and we are going to install in the next couple of weeks it's time to post.

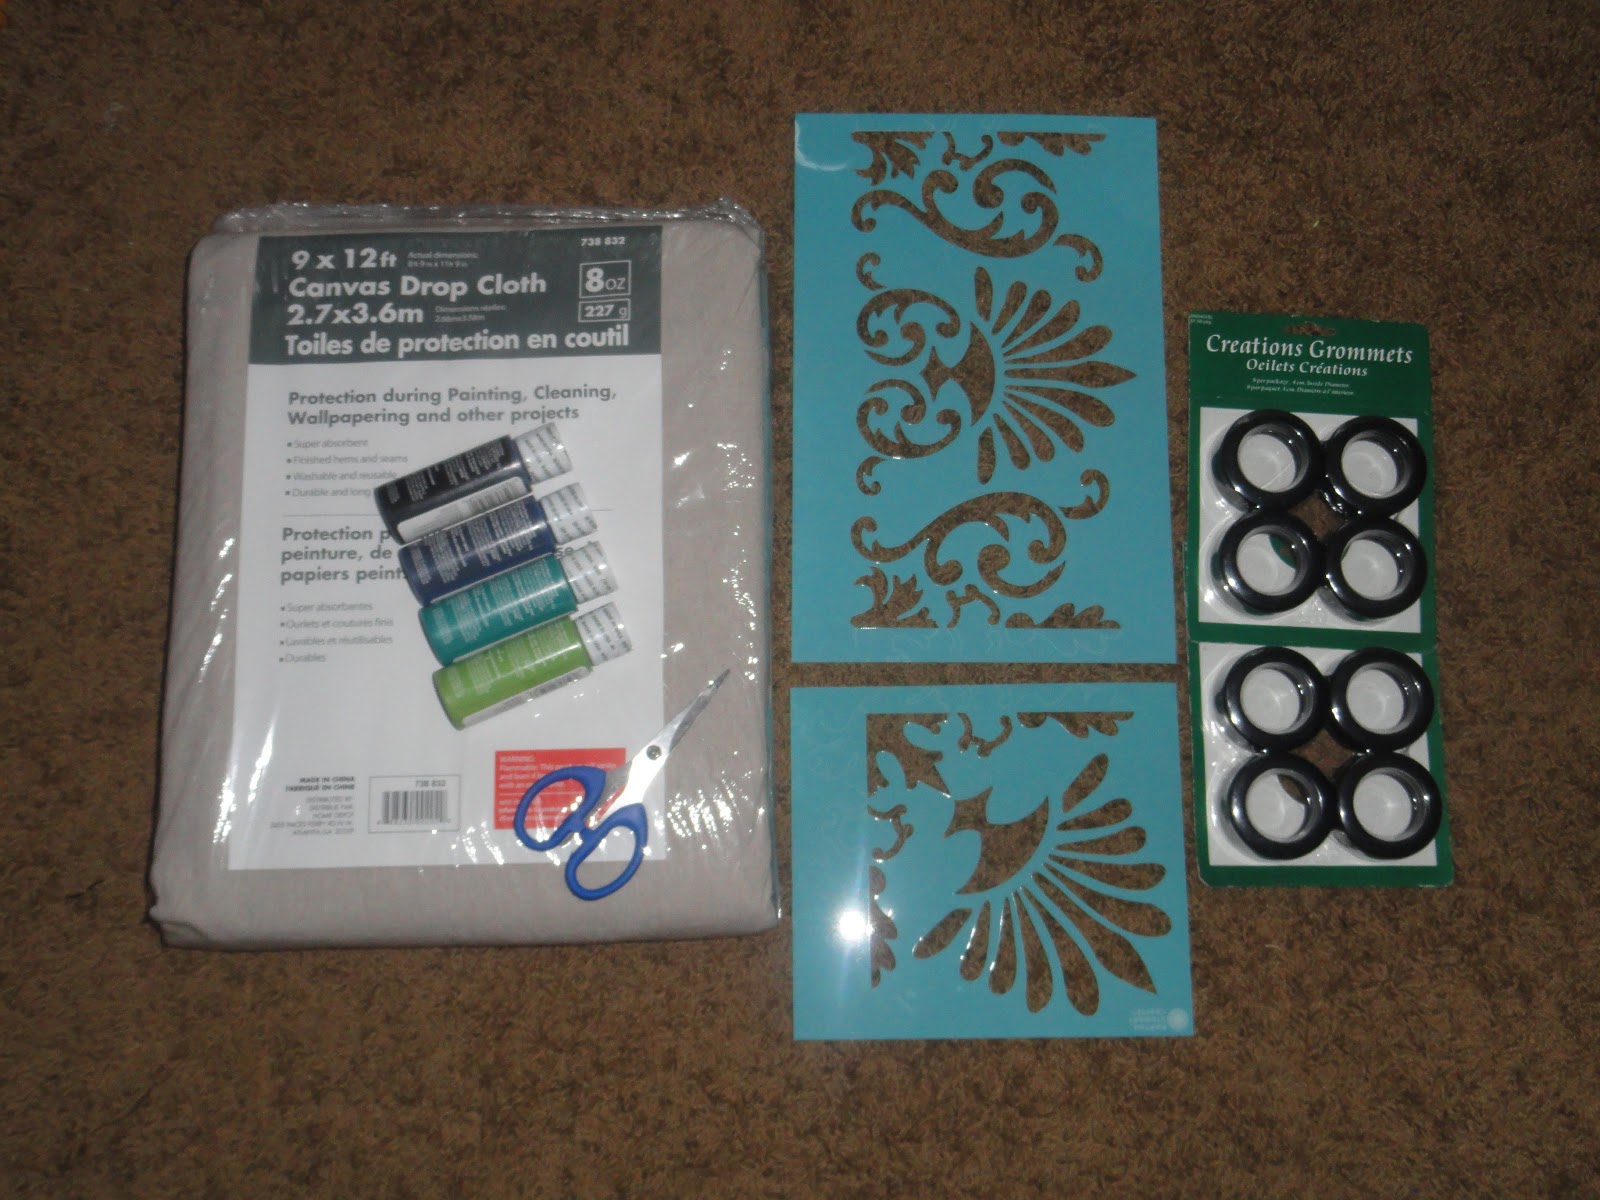
This was a fun project.  I started out with the following supplies:


Two packages of grommets

Martha Stewart stencils

Four colours (all in Kristen's yard)

One package of 9' x 12' drop cloths
Because as you know I live in a very small space I am usually working in the living room for larger projects.   DO NOT DO WHAT I DID HERE!!! I stencilled this on my hardwood floors - when I picked up the drop cloth there was paint all over my floor (what a dummy)! ! ! I did get it all cleaned up though just with soapy water! THANK GOODNESS!

The plan was to go from darkest at the bottom, moving into light and then back to the dark ending with dark again at the top and this plan worked very well until I had to do the opposite side.  I simply worked with the stencil until I got back to the black again and stopped wherever it stopped (obviously math was not used to calculate anything here) . . .
 I KNEW I had to make it opposite but because I'm usually in such a hurry to get everything done I made the opposite drape EXACTLY the same WHICH DOES NOT WORK because when they are hung it would look absolutely WRONG.  So I had to cut the top off of one of the drapes to "even it out" so to speak because of the way the pattern worked out. I know this probably doesn't make sense but if you were here you'd get it!
 This is just a close-up of the variation of colour . . .
 So off to the Beast I go to re-hem the "wrong" drape and we're off to the next step.
 Do I need to say anything about this picture . . .
Now you have to "set" the painted drapes so that they don't fade or "run" if you forget them out in the rain.  I used a simple heat method - truly don't even know if this is going to work but I'll give it a whirl. 

You need wax paper, a cloth on your ironing board so the paint doesn't go ON to the ironing board when you are setting it; and an iron on the NO STEAM setting.
Ironing board, wax paper and an old towel on the ironing board to protect it
No steam setting

Place the drape on the board "painted side up"; place wax paper OVER the painted drape and then press on high heat


Now on to the grommets - these are SUPER EASY to put on. What isn't super easy FOR ME is the math.  I measure the drapes and divide the inches by 8 (because I'm using 8 grommets - ALWAYS USE EVEN NUMBERS OF GROMMETS) and then I place them on the fabric and play with it until I feel like I have it fairly balanced - I HATE MATH!


I have a basic idea that they should be approximately 8" apart

Then I lay them out evenly 8" apart to see how close they come to the ends and start adjusting
The first and last ones should be approximately no more than 2" from the end

Now that I have them in place I follow the simple instructions on the back of the grommet package

Here's the first cut and you can see to the right hand side of the pic I have pencilled in the next one and so on . . . all the way to the other side.

As promised the drapes are now installed - not without a little "discussion" between my daughter and myself with respect to "how to" and "who's going to"!  But they're installed and here are the pics to prove it.

Pergola (Before)

Blocks and Hooks installed

Pergola After

LOVE!
TOTAL (DRAPERY) COST:  Approximately $60.00
TOTAL (SEWING/CREATING) TIME:  Approximately 4 hours

TOTAL (INSTALLATION) COST:  $40.00
TOTAL (INSTALLATION) TIME:  2 hours - 1 for shopping (because I told you we should have gone to Home Depot in the first place) and 1 hour for figuring out how to get the hooks to mount on the pergola so the drapes would (or wouldn't) slide off!