Wednesday, 26 June 2013

Proof I am not a "Decker" - but I give it the good old college try!

A while back I stepped on the corner of the upper deck by the garage and broke off the corner piece . . . no problem . . . I can fix that . . . SURE YOU CAN . . . it'll only take a couple of minutes - NOT!  I had to run back in to the house four times to get the different tools I needed but it got done! ! ! ! !

Note the chipped off corner; had to crowbar the rest off because the guy who built the deck  pushed the screws about 1/2 way down through the wood!

Replaced the corner with a new piece of wood and screwed it down to secure in two places

Trimmed off the excess

This is what tools I had to use (or tried to use) but it got the job done!  Yes they are all mine!
TOTAL TIME:  About 1/2 hour
TOTAL COST:  Zero

Time for a little yard work . . .

Day 12 of vacation and I've only today gotten in the yard to move some stuff around.  The "back" garden has been taken over by quack grass but there is some stuff in there I'd like to keep - the hostas being one!

They were hidden in the back corner near the Virginia Creeper (full of aphids) and while they were doing well they needed to be enjoyed and that wasn't happening in their present location.  So I dug them out . . . decided where I wanted them to go and started digging . . . by the 60 year old +\- tree . . . and I KNEW I was going to hit a root but hoped I wouldn't . . . well I did and here it is

I filled the wheel barrel with dirt I dug out


Cut off the root (literally it looks like a tree branch)

And transplanted the hostas 
TOTAL COST:  ZERO
TOTAL TIME:  A little over an hour - I reworked all of the mulch at the same time on that side of the yard - man I was pooped!

Tuesday, 25 June 2013

Quick and Easy Stencil

Well, I didn't get to go to Radium this week due to roads being washed out and closed in the Alberta Mountain Park areas . . . so I was really HOPING the stencils would arrive while I was at home and they sure did . . . just minutes after I said goodbye to Echo (my daughter's puppy)!  Could I wait to do what I had anticipated doing ever since I purchased them on line just before leaving on my staycay! NO - I had to get right to it . . . I had the colours already picked out (Opalescent Pearl White and Turquoise) and I used them in both rooms (because they "went" in both rooms).

Here's how simple this was . . .

1.  Level the stencil
2.  Put some paint in a small paint tray
3.  With a foam roller (and very little paint), roll over the stencil in both colours


4.  Replace the art beside the saying and . . .

VOILA!


TOTAL COST:  Approximately $20.00
TOTAL TIME:  10 minutes

Now if I could just remember to do what it says . . .

Moving Mirrors and a little stenciling!

I've really got to get outside today but I also need to finish off a project I started yesterday (after I finished the organza flowers) . . . I'm on a roll!

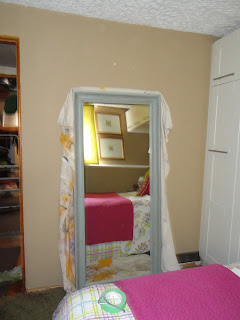
This project entails two mirrors - one that I bought at a garage sale at Seba Beach over 10 years ago (an old door I paid $5.00 for and a mirror I took off of the wall in the bedroom where I was living - don't worry I owned the property) and an IKEA mirror my daughter bought me for Christmas quite a few years ago that's now on its third colour.

I moved the antique door/mirror upstairs and moved the IKEA mirror to the downstairs bedroom . . .

I love what the antique door looks like upstairs now . . .


And the change from the old to the new IKEA Mirror


TOTAL COST:  $20.00 for the stencil
TOTAL TIME:  5 minutes to move the mirrors around with a little help from my very sweet neighbour! About an hour to paint the outside of the mirror (I did three coats); and 10 minutes to do the stencil.

Sunday, 23 June 2013

Feather Fascinator

Ya gotta just use the leftovers some times . . . that a shitty weather keeps me doing my bliss . . .

Here's another one!

Supplies: Feathers, Peacock Feathers, Felt, Hair Clip, Netting, Rhinestone Button

Curl Feathers with blunt end of knife

Affix feathers to felt, then layer on the peacock feathers

Fold netting in a triangle and put running stitch along edge

Running stitch right down to corner and back up other side

Pull thread to gather netting

Secure with whip stitch

Cut off excess felt
Stitch hair comb (didn't use the clip - liked the comb better)

Affix Rhinestone Button


TOTAL COST:  $25.00
TOTAL TIME:  1 HOUR


Large Organza Flowers

After completing the small organza flowers I moved on to the larger ones . . . these are the instructions for the larger ones - basically the same as the small ones but I folded them a bit differently - I folded them in HALF and then pulled the corners down so the petals were more pointed.

Then sewed straight across the bottom and gathered them (also clipping off the corners on the sewed edges NOT the folded edges)


and after completing the three different flowers I made tie backs with a piece of green polyester satin approximately 30" in length and rounding out the corners so that when it was tied it looked like leaves!

I layered the buttons on the large ones - I set down a pearlized flat antique button first and then cut the backs off of the ones with the rhinestones and glued them down on top of the pearlized ones.

Here is the finished product:
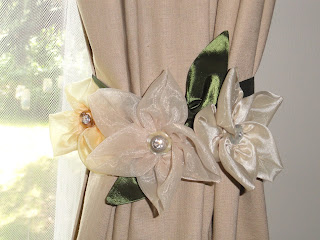


The yellow ones are the four petal ones and the taupe and cream ones are the larger ones.

TOTAL COST:  $10.00 (I had the green fabric from another project - the buttons were the most expensive thing)
TOTAL TIME:  1.5 HOURS (for all four large ones)


Organza Flowers

Well I've been home 9 days and I've probably spent 6 of them INSIDE - the weather here has been horrible and I was supposed to go to Radium this week for a couple of days but due to road closures it's not looking promising (if at all).  Roads have actually been washed out in parts of Alberta and the Army (including my son-in-law) has gone to High River to help.  So I stay inside and make flowers - came up with this "bright" idea whilst drinking Sangria on Friday night (way too much of it I might add) and went to work yesterday.

I started with 5" squares of organza (4" squares for the smaller ones) and folded them like this (these are the smaller 4" flowers)
Fold in a Triangle, fold corners in and pin

I hand stitched these down with a running stitch


Gather stitch - pull tight, but not so tight you break the thread!

Clip off the corner


Take another piece and cut in half then fold in half

Clip off the corners

Gather all petals, felt and button

Glue down first petal with hot glue gun


Glue down second petal

Third petal

Fourth petal

Glue down button (aren't they beautiful)

Finished small flowers


TOTAL COST:  $5.00 (had lots of organza left over - the minimum I can purchase is .2M so will save for another project)
TOTAL TIME:  1/2 HOUR


Tuesday, 18 June 2013

Bridal Fascinator

How exciting that I now get to have a bride wear one of my fascinators.  Karen will be married in November but she's obviously already planning and I'm creating . . . I may even get to help her with the decorating of the hall but for now we're working on what she's going to wear.

Here's what I started with - a request from the bride for a black flower with peacock feathers to match her colour scheme . . . she'll have ivory, black, lime green and purple.

Supplies

Step 1 - these feathers were in a package twice the size - I cut them in half

Step 2 - curl feathers on larges peacock feather with blunt end of knife - glue down over black feathers

Step 3 - tear away feathers from bottom of peacock feathers and bundle (I wrapped black thread around and secured first)
 - curl with blunt end of knife

Step 4 - add largest flower

Step 5 - add smaller flower

Step 6 - turn over and cut away excess felt


Step 7 - glue down hair clips


Voila - fascinator fini!
I will work on the russian netting (for the veil) once I have the bride in my presence so that she gets exactly what she wants - don't you LOVE custom!

TOTAL COST:  $35.00 in materials
TOTAL TIME:  1.5 Hours - many hours of hit and miss with various drafts!